This is a blogpost about joining Windows 10 machines unattended to Azure AD with a provisioning package created with the Windows Configuration Designer. The enrollment is done with a token which is created by a service account which services the Azure AD Join.
Prerequisites
Create a service account in Azure AD to create the bulk enrollment token. This can be a normal Azure AD account. No roles are required.
Download the Windows Configuration Designer
Licensing for Intune and Azure AD Premium.
Creating the WCD Package
Launch the Windows Configuration Designer, this is mentoined in the prerequisites. This piece of the blogpost looks a lot like the Microsoft document but I have added some improvements. Furthermore, I have added this to my blog to make it complete. Otherwise I would only have the example of the unattended Azure AD join to show you.
Click on “Provision desktop devices”:

Name the project, choose a location and provide a description:

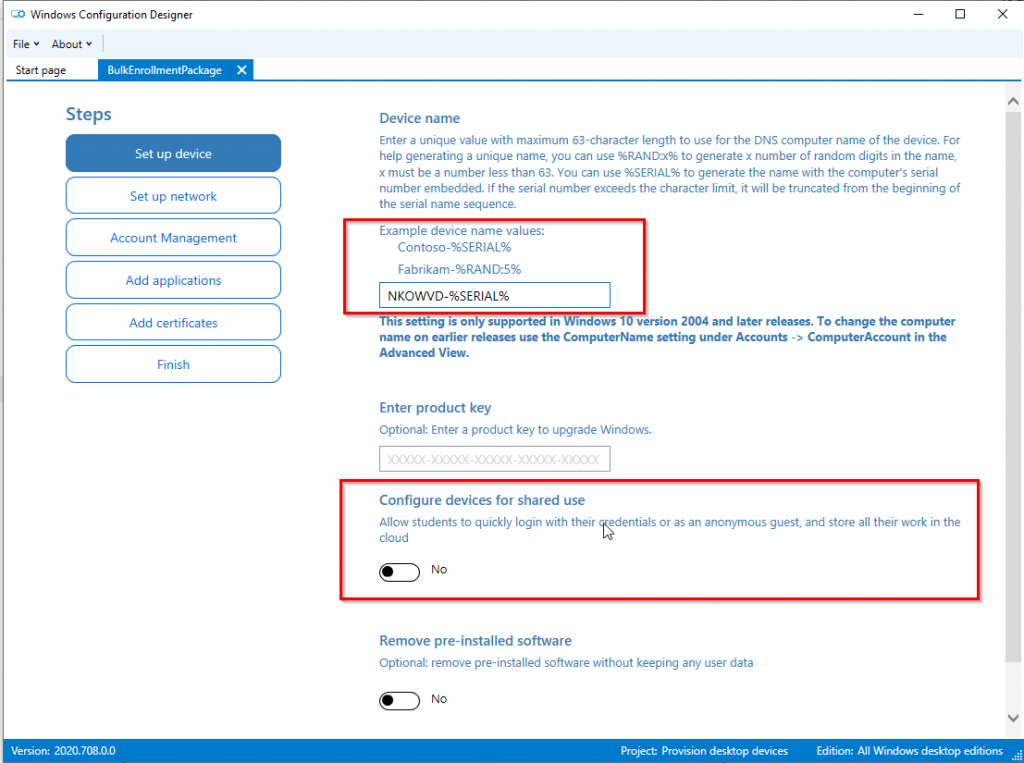
Set the device name:
In addition, here you could set the devices for shared use:

Optional: Set up a Network (I skipped this):

Select “Enroll in Azure AD”, choose a Bulk token Expiry date and click on “Get Buk Token”: (max token lifetime is 180 days)

After you logged on to get the bulk token you get the need to accept this prompt:

Select sign in to this app only:

You can optionally add Applications and Certificates.
Last but not least, click on “Create”:

This is the output:

Please check the existence of all files. Now it is time to run the package in the example.
Example unattended Azure AD Join
This is an example to show you how to enroll a machine which is managed by a Remote Management tool but not domain joined.
I have created an Hyper VM with Windows 10 installed. I created a local useraccount to run the package for the unattended Azure AD Join. Furthermore, exclude the serviceaccount from Conditional Access since this is not supported at the time of writing.
I copied the package to VM to mimic the remote management tool that will do this for you.
Then I ran “dsregcmd /status” to check the current state of the machine:

Here you see the current state of the machine. The Azure AD Join is not available and the naming convention is not applied.
Run the following command to run the package:
Install-ProvisioningPackage -PackagePath "C:\temp\BulkEnrollment\BulkEnrollmentPackage.ppkg" -QuietInstall #use the PackagePath accordingly

Reboot -r -f -t 00
After you run the command this will show:

The machine boots again and you are logged in to Windows.
Run “dsregcmd /status” again:

The machine is now joined and the naming convention is applied.
In Endpoint manager the machine doesn’t have a primairy owner yet:

After that I logged on with my Intune test user. The Enrollment Status Page was shown:

The desktop of the user is shown and the user is able to use the device with their Intune account:

References
Nick Manganiello contacted me via LinkedIN with this. I helped with his AutoPilot deployment.
BulkEnrollment
AutoPilot Tip & Tricks
Hello,
Is it possible to run the .ppkg on a domain joined pc to move it to Azure AD (windows 10 device joined to on prem AD).
Hi Hayek,
I think it can. To be sure you can check the microsoft documentation.
Kind Regards,
Niels
Hayek,
I tried to do that with a very basic ppkg (only Azure Join and computername) but it did not work. The package gave a non-descriptive error. After leaving the On-Premises AD, the package worked as expected.
Hi Max,
For the PPKG package to work the machine cant be domain joined.
Kind Regards,
Niels
Hi there Niels,
Awesome site you have here! Quick question please:
Do you happen to have the same thing (process) behind the Windows Configuration Designer but power shell based for joining devices to MDM with a bulk token?
Hi Vlad,
I will take a look at that!
Thanks,
Niels
Hi Vlad,
You can take a look at this:
https://www.powershellgallery.com/packages/ProvisioningTools/1.2.3/Content/Public%5CNew-ProvisioningPackage.ps1
Thanks!
Niels
Hi Niels,
I’ve tried your method, which failed, so only after much investigation, I was able to determine that the problem was not having an Azure AD Premium subscription.
Please add that in your tutorial as it is quite misleading.
Kind Regards
Vossie
Hi Vossie,
I am sorry and I assumed that the licensing part was clear. It’s not, I will add it to the blog.
Thanks for the feedback.
Niels
Is there a way to do this without renaming the PC?
You could try to leave the field empty? Could you reply what happens?
I know it doesn’t allow you to leave the computer name blank
Hi Niels,
Do you know whether setting the Network settings section to Wi-fi enabled and adding wireless network SSID and passkey, will allow the device to join the Wifi network after the installation of Windows is complete and during the first boot (before the desktop shows) so that the first login screen allows you to log into an Azure account?
I hope that makes sense!
Thanks
Hi Divesh,
Thanks for your comment. I know that when you configure a configuration profiles with a wifi SSID and password that it will automatically connect. I don’t have used your specific method but I would assume it works.
Regards,
Niels
Hi
can you tell me how to create a service account with azure ad, because it throws error with my normal ID, bulk retrieve failed
Hi Kumar,
I just created a regular account. Nothing special.
You might run in to the issue where you use the wrong version of the Windows Configuration Designer.
Which one did you download?
Thanks,
Niels