Packer is a great tool to build images. This blog is about using YAML to build your Packer Azure DevOps Pipeline. When using YAML, it is very easy to replicate your pipeline to other Azure DevOps organizations. So, what is the architecture about?
Firstly, let’s start with this high level design of a packer build:
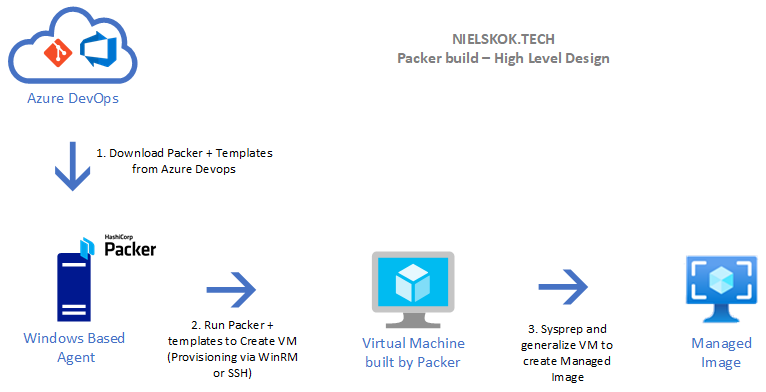
The packer build runs basically in 3 “main steps”.
1. The windows based agent which is connected to your Azure DevOps environment starts the build. Packer is downloaded alongside the templates from the DevOps GIT repository.
2. Packer runs on the “Windows Based Agent” and start to create a seperate resource group where the VM is build. Firstly, the VM is created. After that, the provisioning process starts. Windows Updates and applications are installed.
3. The last step is that the VM is sysprepped and generalized to output a managed image in a seperate resourcegroup. After that, the resource group with the VM and the resources needed is deleted.
In addition, a forth step could be that the managed image is uploaded to a Azure Compute Gallery. I will write a part 2 to this blog which features adding the shared image gallery to this build.
Prerequisites
You need to have your Azure DevOps organization and Azure tenant setup. I have written a blog on how to do so. This is the link.
After that, you are ready to start this blog!
Add Packer to Azure DevOps
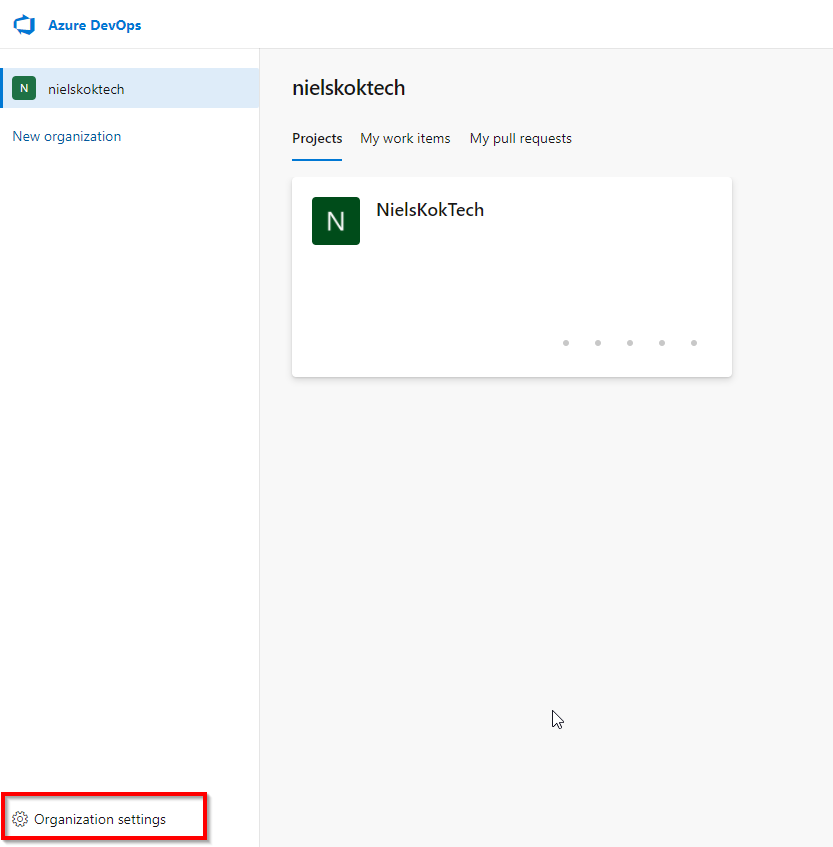
Firstly, we need to add Packer to Azure DevOps in order to use this feature.
Log on to Azure DevOps.
Next, go to Organization settings:
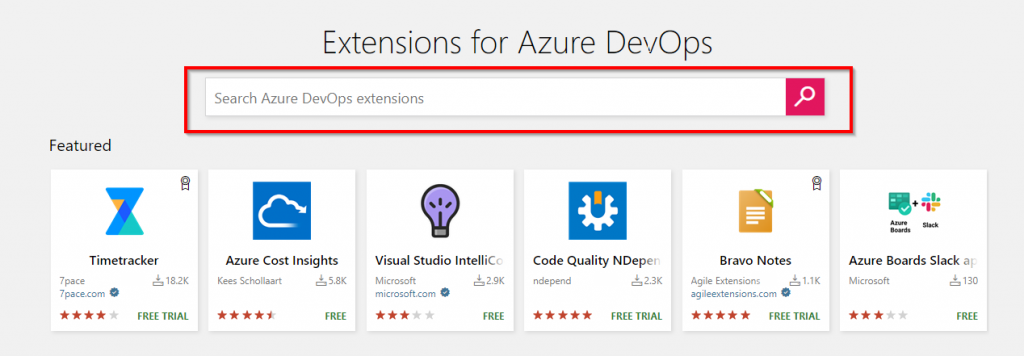
After that, go to extensions:

Browse the marketplace and search for Packer:


Click on “Get it free”:

Select your organization and click install:


Packer is now available in your organization:

Create the Key Vault
Firstly, we need to make sure that the “Service Principal Application ID” and the “Service Principal Secret” are available in your Azure Key Vault.
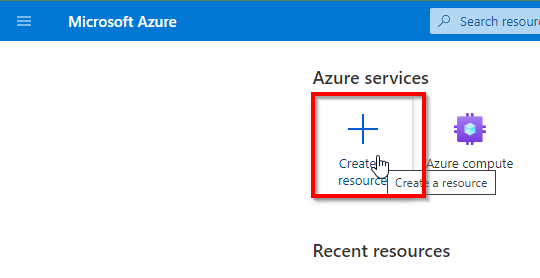
If you don’t have an Azure Key Vault, we first need to create one.
Go to the Azure Portal and click on create a resource:
After that, search for “Key vault” and create one:


Make sure your Service Principal may access the Key vault:


I am allowing all networks. If you limit this option, make sure your Azure DevOps environment and Agent can reach the keyvault.

After this, go to review and create.
Lastly, create the Key Vault.
Go to your keyvault and go to “Secrets”:

Add your Service Principal App ID and Service Principal Secret:

Go back to Azure DevOps. Go to Pipelines and to Library:

Create a new variable group:

Call it Azure Key Vault and add the variables from the newly created Azure Key Vault:

Now you can use the variables in your pipelines.
Create the Packer Pipeline
Variable Groups
Firstly, we need another variable group. Go back pipelines and to library:
Create a new variable group:
Add these variables to the group:
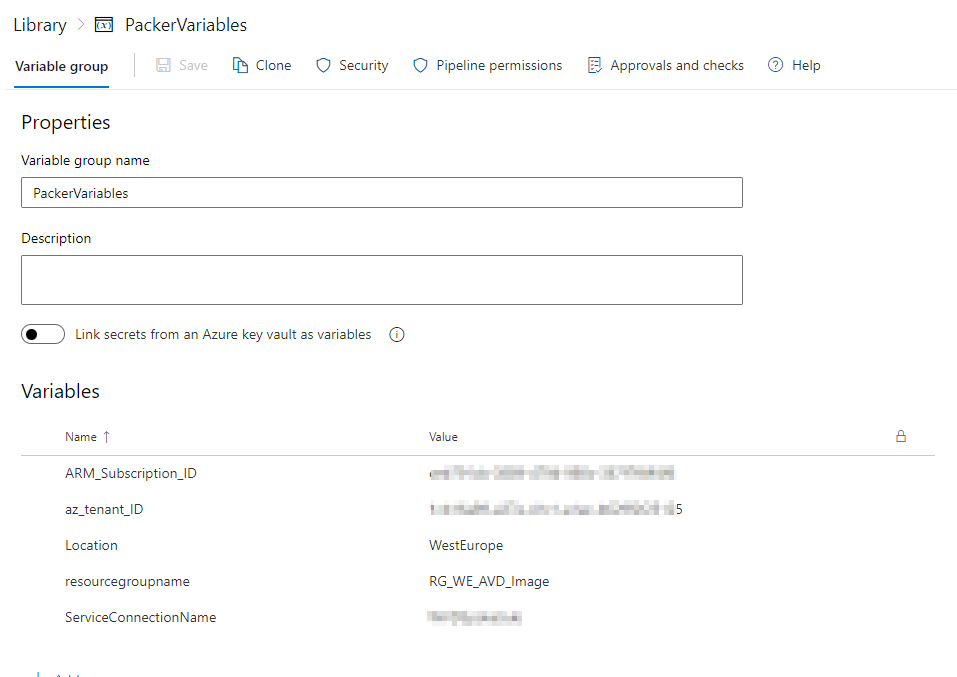
ARM_Subscription_ID –> the ID of the subscription that you want to deploy in. (The service connection must also be mapped to this subscription.
az_tenant_id –> This is ID for your Microsoft 365 Tenant
Location –> This is the location of the Resource Group for the Managed Image.
resourcegroupname –> This is the name of the Resource Group for the Managed Image.
ServiceConnectionName –> This is the name of the Service Connection used.
Template Files
After that, we add the packer files to Azure DevOps. I put these files in Github account. You can find them here:
1. Windows 10 Packer template file.
2. Windows 10 Packer variable file.
3. Windows 10 Packer YAML file.
4. ARM template for creating a resource group.
Put these file in your GIT repo in a folder called “Packer”. Furthemore, if you put the files here. you don’t have to change the paths in the YAML file later.

In addition, I have also displayed the YAML file here. I need to explain a few variables.
trigger: none

pool:
  name: 'AGENT POOL NAME'

variables:
- group: 'PackerVariables'
- group: 'YOUR VARIABLE GROUP (KEYVAULT)'

stages:
- stage: CreateResourceGroup
  jobs:
  - job: CreateResourceGroup
    steps:
    - task: AzureResourceManagerTemplateDeployment@3
      inputs:
        deploymentScope: 'Resource Group'
        azureResourceManagerConnection: '$(ServiceConnectionName)'
        subscriptionId: '$(ARM_Subscription_ID)'
        action: 'Create Or Update Resource Group'
        resourceGroupName: '$(resourcegroupname)'
        location: '$(Location)'
        templateLocation: 'Linked artifact'
        csmFile: 'Packer/EmptyResourceGroup.json'
        deploymentMode: 'Incremental'

- stage: RunPacker
  jobs:
  - job: CreateImage
    steps:
    - task: riezebosch.Packer.PackerTool.PackerTool@0
      displayName: 'Use Packer Latest'

    - task: riezebosch.Packer.Packer.Packer@1
      displayName: 'Packer version'
      inputs:
        azureSubscription: '$(ServiceConnectionName)'
        templatePath: 'Packer/Windows10AVDImage.pkr.hcl'
        command: version

    - task: riezebosch.Packer.Packer.Packer@1
      displayName: 'Packer init'
      inputs:
        azureSubscription: '$(ServiceConnectionName)'
        templatePath: 'Packer/Windows10AVDImage.pkr.hcl'
        command: init

    - task: riezebosch.Packer.Packer.Packer@1
      displayName: 'Packer validate'
      inputs:
        azureSubscription: '$(ServiceConnectionName)'
        templatePath: 'Packer/Windows10AVDImage.pkr.hcl'
        command: validate
        variables-file: 'Packer/Windows10AVDVariables.pkr.hcl'

    - task: riezebosch.Packer.Packer.Packer@1
      displayName: 'Packer build'
      inputs:
        azureSubscription: '$(ServiceConnectionName)'
        templatePath: 'Packer/Windows10AVDImage.pkr.hcl'
        variables-file: 'Packer/Windows10AVDVariables.pkr.hcl'
Firstly, you need to change these variables in the YAML file:
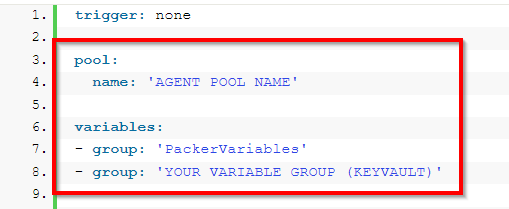
‘AGENT POOL NAME’ –> Name of the pool of agents created in the preparation part.
Don’t change the name of the ‘PackerVariables’ group.
‘YOUR VARIABLE GROUP (KEYVAULT)’ –> If you followed this blog, this ‘AzureKeyVault’. If you did not, please enter your own Key Vault name.
Furthermore, if you did not put the files in the folder “Packer” please change these variables:
For the ResourceGroup creation:

And foreach Packer task:

After that, we edit the Packer Variables files. The file looks like this:

Make sure you edit the following variables:
client_id –> Insert he variable from the AzureKeyVault variable group.
client_secret –> Insert he variable from the AzureKeyVault variable group.
virtual_network_name –> Name of your Virtual Network in Azure.
virtual_network_resource_group_name –> Name of your Virtual Network ResourceGroup Name.
virtual_network_subnet_name –> Name of the subnet in Azure.
In addition, by default the private_virtual_network_with_public_ip is set to false. Make sure that your agent can make a WinRM connection to the private IP address of the VM that is created by Packer. If you are not sure, set this to “true”.
Create Pipeline
Lastly, it is finally time to create the Packer Pipeline itself. Go Pipelines and select Pipelines:

After that, create a new pipeline:
In addition, if you don’t have any pipeline it will ask you to create your first pipeline.


Lastly, click on save:

And that’s how your create a Packer YAML pipeline in Azure Devops!
Packer YAML pipeline example run
Click on Run Pipeline:


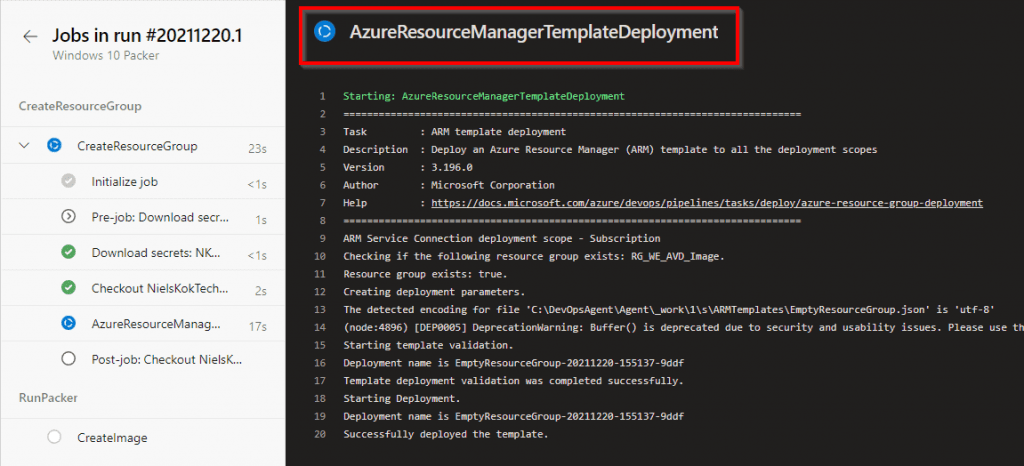
Firstly, the resource group task runs:
After that, the packer build starts:

WinRM connects, downloads and install Windows Updates:

Reboot & Sysprep:

Lastly, the managed image:

Hi Niels
I love the work you do and your blog
I have few questions
1. Service Principal App ID and Service Principal Secret: the Principal App ID is the App registrations that we did? but where did we set a Service Principal Secret?
2.
virtual_network_name –> Name of your Virtual Network in Azure.
virtual_network_resource_group_name –> Name of your Virtual Network ResourceGroup Name.
virtual_network_subnet_name –> Name of the subnet in Azure.
should we make a new RG , Network add the valuse as there where no step to make new RG etc?
3. when i hit Click on Run Pipeline:
i get
An error occurred while loading the YAML build pipeline. Variable group was not found or is not authorized for use. For authorization details, refer to https://aka.ms/yamlauthz.
i thikn Point 1 i did worng ?
Hi Raf,
Thanks for the compliment!
To answer your questions:
1. The secret was created in the preparation blog. But this blog will show you how to do so (Authentication, Option 2) https://github.com/MicrosoftDocs/azure-docs/blob/master/articles/active-directory/develop/howto-create-service-principal-portal.md
2. I would advise you to create a separate Resource Group and create the Virtual Network there. Then add the values of the virtual network to your variable file.
3. Go to Pipelines > Library > Click on your variable group > in the top bar you have the option for “Pipeline Permissions” make sure that your Pipeline is added here.
Thanks,
Niels
Hi Niels
for point 3 i did add pPermissions but still fail but when i go to”Stages to run” i see error
Unable to load the pipeline’s stages.”: i did use your ymail so not sure about the error
thx for help
Hi Raf,
Did you change the YAML file to your environment accordingly? The error states that the YAML syntax is incorrect.
Thanks,
Niels
hi,
Yes, it drive me mad, could send on email screns? could help me ?
Hi Raf,
Drop me an e-mail at niels@nielskok.tech
Thanks,
Niels
done. thx
Hi,
Here is a typical question from our customers – why would NOT you use Azure native tool , AIB , and sticking using Packer .. ?
What is the reasoning ? Or what are benefits using Packer for typical AVD image deployment ( for example) ..
How would have you answered such a question?
(PS customization tasks to be used within a template – only PowerShell/cmd)
TIA
Hi Maxim,
Thanks for your question. Packer is multicloud and it also can be used on-premises. That way I always can use the same template for all images for all clouds and infrastructures. If you only use Azure you could use Azure Image Builder also. It is very much like packer.
Thanks,
Niels
Hi Niels,
Excellent job and post.
My question is about to update an existing image in a shared Gallery, Which parameter, variable i need to change or add?
Hi Javier,
Thanks! In part 2 you need to change these parameters:
-SharedImageGalleryName ”NKO_SharedImageGallery” -SharedImageGalleryRG ”RG_WE_AVD_SharedImageGallery” -SharedImageGalleryDefinitionName ”AVDImage”
If you have any more questions, just let me know. 🙂
Niels
Thanks
Hi Niels,
I was trying to update an image from a Imagegallery and i can´t.
Reviewing the files ” Windows10AVDImage.pkr.hcl” and “Windows10AVDVariables.pkr.hcl” . What´s “custom_managed_image_name” in a image gallery or it´s necessary to use another parameter?
Case:
21H2_avd is a VM image definition in a Azure compute Gallery” in n the resource group ‘rg_packer”
When build the pipeline, appear the next error;
” azure-arm.windowsvm: Cannot find an image named ’21H2_avd’ in the resource group ‘rg_packer”
Any idea to resolve this issue
Thanks
Javier
Hi Javier,
Did you complete the second part of this series? If you did not, please do so and try again.
Kind Regards,
Niels
Hi Niels,
Thanks for your answered
I have create the image, upload programs, execute powershell and upload it a Gallery, but always with Public IP, It´s possible to create an Image without Public IP?
Thanks
Javier
Hi Javier,
It is possible. Please search for “we edit the Packer Variables files” in the post and that’s where I describe how to do so.
Kind Regards,
Niels
hi Niels, are you using azure devops linux agent or windows agent ?
my pipeline failing on packer version task trying to load packer config – it is 100% related to windows update plugin
##[debug]templatePath=/home/vsts/work/1/s/Packer Build/packer_BYOD.pkr.hcl
##[debug]check path : /home/vsts/work/1/s/Packer Build/packer_BYOD.pkr.hcl
##[debug]/opt/hostedtoolcache/packer/1.8.0/x64/packer arg: /home/vsts/work/1/s/Packer Build/packer_BYOD.pkr.hcl
##[debug]exec tool: /opt/hostedtoolcache/packer/1.8.0/x64/packer
##[debug]arguments:
##[debug] version
##[debug] -var
##[debug] client_id=***
##[debug] -var
##[debug] client_secret=***
##[debug] -var
##[debug] subscription_id=0a6b8caa-6c92-46a4-8436-5f284082c02b
##[debug] -var
##[debug] tenant_id=56be28a2-156c-41ee-9970-91a4eceaa43a
##[debug] /home/vsts/work/1/s/Packer Build/packer_BYOD.pkr.hcl
/opt/hostedtoolcache/packer/1.8.0/x64/packer version -var client_id=*** -var client_secret=*** -var subscription_id=0a6b8caa-6c92-46a4-8436-5f284082c02b -var tenant_id=56be28a2-156c-41ee-9970-91a4eceaa43a /home/vsts/work/1/s/Packer Build/packer_BYOD.pkr.hcl
Error loading configuration:
exit status 2
##[debug]Exit code 1 received from tool ‘/opt/hostedtoolcache/packer/1.8.0/x64/packer’
##[debug]STDIO streams have closed for tool ‘/opt/hostedtoolcache/packer/1.8.0/x64/packer’
##[debug]task result: Failed
##[error]Error: The process ‘/opt/hostedtoolcache/packer/1.8.0/x64/packer’ failed with exit code 1
##[debug]Processed: ##vso[task.issue type=error;]Error: The process ‘/opt/hostedtoolcache/packer/1.8.0/x64/packer’ failed with exit code 1
##[debug]Processed: ##vso[task.complete result=Failed;]Error: The process ‘/opt/hostedtoolcache/packer/1.8.0/x64/packer’ failed with exit code 1
Finishing: Packer version
Hi Maxim,
Thanks for your message. I am using a Windows Based Agent. I think that is the problem indeed.
You could look at windows based agent in a container.
Kind Regards,
Niels
Excellent run through, thank you… I am having some trouble with variables though…
On line 33 of the “Windows10AVDImage.pkr.hcl” file, you use;
`”Windows10_${env(“Build_BuildNumber”)}”` – this passes validation but when built the image does not contain the Build_BuildNumber.
I have tried setting the following instead, in the variables file;
`managed_image_name = “Windows10-1-0-$(Build_BuildNumber)”`
and also
`managed_image_name = “$(managed_image_name)”` #where $(managed_image_name) is defined in a devops yaml file
Both of these produce errors, similar to below;
The setting managed_image_name must match the regular expression “^[^_\\W][\\w-._)]{0,79}$”, and not end with a ‘-‘ or ‘.’.
However, if i manually set the value to be, for example “Windows10-1-0-001” – this works fine.
What is the best way to use ADO variables without having to do run time substitution? With terraform, you can set variables that start with prefix `tf_env` without having to subsitute them
The same can also be said about the variables;
“managed_image_resource_group_name” & “build_resource_group_name” when using an azure variable
ado var;
-name: managed_image_resource_group_name
value: “rg-packer-env-01”
packer var;
managed_image_resource_group_name = “$(managed_image_resource_group_name)”
when using the ado variable error presented is; The setting managed_image_resource_group_name must match the regular expression “^[^_\\W][\\w-._)]{0,79}$”, and not end with a ‘-‘ or ‘.’.
If i copy and paste the literal string from the ADO var it works perfectly. I don’t understand?!
Hi.
Thanks mate. I just hardcode the variable for the imagename in the packer template:
variable “managed_image_name” {
type = string
default = “Windows10_${env(“Build_BuildNumber”)}”
}
That is the easiest thing to do. I don’t use the managed image anyways since I am uploading it to an Azure Compute Gallery to create multiple versions.
Thanks,
Niels
I figured this out before I took a short break, the issue, as with so many coding issues, was down to something really simple and stupid…
Variables & casing…
When using for example;
vm_size = $(packer_vm_size) in the *variables.pkr.hcl file – this is fine (as long as the variable exists somewhere!).
infact a better example is (as System_DefaultWorkingDirectory is built in);
WorkingDirectory = “$(System_DefaultWorkingDirectory)”
However when using variables in the *image.pkr.hcl file you need to capitalise (when running on a linux agent anyway) and refer to variables like so;
variable “managed_image_name” {
type = string
default = “${env(“MANAGED_IMAGE_NAME_PREFIX”)}-${env(“BUILD_BUILDID”)}”
}
and then use the variable like;
source “azure-arm” “windowsvm” {
managed_image_name = var.managed_image_name
}
It was very obvious and may be even more obvious to other readers but posting here incase it is not 🙂
That is true. Linux-based agents interpret the variables differently than windows based agents. Thanks for posting the feedback.
Thanks Niels for a detailed write up, i am currently stuck at this point in the “Packer Build” section, i have seen a few comments above however i am not able to get this addressed following them, i am very new to Azure DevOps and wanted to understand on what needs to be done here to get rid of this message.
##[debug]Exit code 1 received from tool ‘/opt/hostedtoolcache/packer/1.8.5/x64/packer’
##[debug]STDIO streams have closed for tool ‘/opt/hostedtoolcache/packer/1.8.5/x64/packer’
##[debug]task result: Failed
##[error]Error: The process ‘/opt/hostedtoolcache/packer/1.8.5/x64/packer’ failed with exit code 1
##[debug]Processed: ##vso[task.issue type=error;]Error: The process ‘/opt/hostedtoolcache/packer/1.8.5/x64/packer’ failed with exit code 1
##[debug]Processed: ##vso[task.complete result=Failed;]Error: The process ‘/opt/hostedtoolcache/packer/1.8.5/x64/packer’ failed with exit code 1
Finishing: Packer build
Hi Phani,
Thanks for your comment. At what stage does this error show up? What does work and what doesnt? Which agent do you use?
KR,
Niels
Thanks for taking the time to create this blog. Can you help clear up some confusion about all the Resource Groups?
Resource Group 1 = Hosted agent VM (where I installed agent for pool agent)
Resource Group 2? = managed_image_resource_group_name (variable)
Resource Group 3? = virtual_network_resource_group_name (variable)
The post said to make sure “In addition, by default the private_virtual_network_with_public_ip is set to false. Make sure that your agent can make a WinRM connection to the private IP address of the VM that is created by Packer. If you are not sure, set this to “true”, so should my agent and the VM created by Packer be in the same Resource Group + Subnet to facilitate this?
Hi Ryan,
They can be in multiple resource groups, VNET or even infrastructures.
I host my own agent in my VMware lab but I make sure that it can reach the internal IP address of the VM that is being built by Packer.
Just make sure that the machine that is hosting the devops agent can reach the VM on its internal IP Address.
Thanks,
Niels
Is there a specific reason Packer can not be run in the Azure hosted runner vs self-hosted as we did in this guide?
Hi Ryan,
For new free devops environments that is not an option anymore. You can do so but then you must pay for the instance.
Those were being used for crypto mining.
Thanks,
Niels
hi Niels
love the work you do!
i have some questions
If i want to creat a devops pipline should i flow Win 10 seris or YAML once.?
I need to do create a vm and capture the image in 1 RG is that posible ?
Hi David,
Thanks mate.
I would advise you to use YAML.
Furthermore, If you want to capture an image I would do this in another resource group so you can discard the resourcegroup where you created the VM more easily.
Thanks,
Niels
why could i want to discard the RG?
After you captured the image, I always clean up. But that is just preference. If you have another strategy, that is totally fine.
Hi Niles
I straded to work on this looks god but when 1 run it i get this
e: ‘/subscriptions/***/providers/Microsoft.Compute/locations/WestEurope/publishers/MicrosoftWindowsDesktop/ArtifactTypes/vmimage/offers/Windows-10/skus/21h1-evd/versions/latest’
==> azure-arm.windowsvm: ERROR: -> ResourceNotFound : The Resource ‘Microsoft.Compute/images/Windows10_’ under resource group ‘rgr-test’ was not found. For more details please go to https://aka.ms/ARMResourceNotFoundFix
Fix i need to use build_resource_group_name
like here https://github.com/riezebosch/vsts-tasks-packer/issues/8
now I get this , could you help Niels
ERROR: -> InvalidTemplateDeployment : The template deployment failed with error: ‘Authorization failed for template resource ‘pkrkvx7kg6s8reb’ of type ‘Microsoft.KeyVault/vaults’. The client ” with object id ” does not have permission to perform action ‘Microsoft.KeyVault/vaults/write’ at scope ‘/subscriptions/***/resourceGroups/rgr-test/providers/Microsoft.KeyVault/vaults/pkrkvx7kg6s8reb’.’.
sorry all fixed my SP did had correct rights
Cool, thanks for letting me know.
i did all like you but i get this error
azure-arm.windowsvm: >>> Sysprepping VM …
azure-arm.windowsvm: IMAGE_STATE_COMPLETE
azure-arm.windowsvm: IMAGE_STATE_UNDEPLOYABLE
azure-arm.windowsvm: IMAGE_STATE_UNDEPLOYABLE
azure-arm.windowsvm: IMAGE_STATE_UNDEPLOYABLE
azure-arm.windowsvm: IMAGE_STATE_UNDEPLOYABLE
azure-arm.windowsvm: IMAGE_STATE_UNDEPLOYABLE
azure-arm.windowsvm: IMAGE_STATE_UNDEPLOYABLE
azure-arm.windowsvm: IMAGE_STATE_UNDEPLOYABLE
azure-arm.windowsvm: IMAGE_STATE_UNDEPLOYABLE
azure-arm.windowsvm: IMAGE_STATE_UNDEPLOYABLE
Hi David,
I’m having the same problem as you, I’ve searched everywhere, but I’m really stuck. Were you able to resolve this error?
Regards,
David
Hi David,
What problem are you facing?
Thanks,
Niels
Hi. Is it possible to use an existing resource group which is already created? Unfortunately my azure sandbox doesn’t let me create new resources groups. Thanks
Hi Mar,
I don’t know actually, you could check the docs for it:
https://developer.hashicorp.com/packer/docs
Thanks,
Niels