The next part! Create an image in Nerdio using PSNerdio. So, the next step is of course creating an image in Nerdio. We want to do that automatically via PSNerdio. So, let’s add some CMDlets to the module to make sure we can do everything from code.
Link to the GitHub repo.
Other parts of this series:
Deploy Nerdio from an IAC perspective (Introduction)
Link all required resources to Nerdio
Create an Image in Nerdio using PSNerdio
Enrich the image with Scripted Actions, Applications, and Schedules
Deploy dynamic hostpools using PSNerdio
Linking a network using PSNerdio
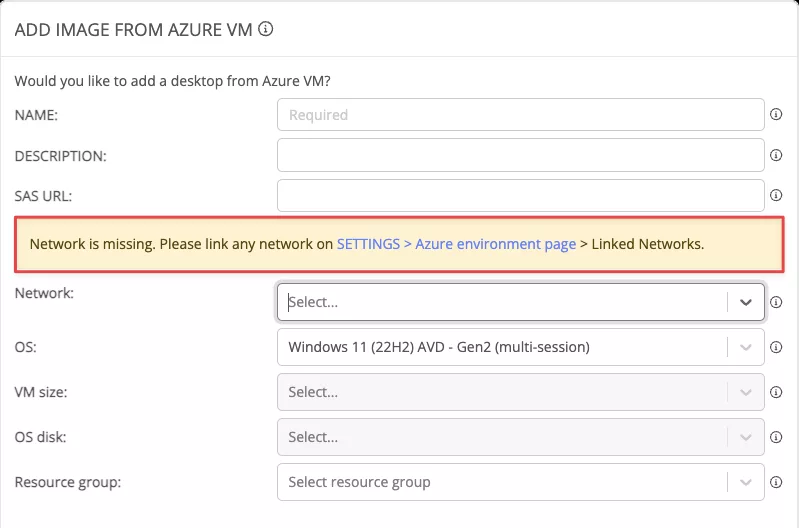
First, I just copied the example from the Nerdio documentation and tried to make a CMDlet out of it. I couldn’t get it to work. So, I opened the UI to check what was going on. I missed a piece. You must have a network linked to Nerdio:
So, let’s create some CMDlets:

Run command:
# Linked Network
$LinkedNetwork = @{
  subscriptionId = "SubscriptionId"
  resourceGroup  = "ResourceGroupName"
  vnetName       = "Vnetname"
  subnetName     = "subnetname"
  isDefault      = $false
}
New-NerdioMELinkedNetwork @LinkedNetwork
After that, the network is linked automatically and I could add a desktop image:

My only feedback would be that the API call is much different from linking a resourcegroup. I would expect them to be the same but there are quite different:
Networks:

ResourceGroup:

Lastly, the networks API endpoint should be without an s at the end.
Creating an Image using PSNerdio
So, back to the image it is! Let’s see if our previously created CMDlet works. The keen eyed among you probable spotted that CMDlet in the first screenshot. The new CMDlet is “New-NerdioMEDesktopImage”:

At first tried to replicate the same request as in the browser session with Nerdio Manager for Enterprise. That request is different then when you use the Rest API method. That differs from the Microsoft API’s where you can just use F12 to figure out the request you must make. So, please always use the swaggger documentation. Otherwise, you will end up with this:

So, now to creating the desktop image. It has a lot of variables and I have set defaults for a lot of them to keep the command simple. This is the command to create a new desktop image based on a managed image:
$Password = ConvertTo-SecureString "Thisisatest123!" -AsPlainText -Force

New-NerdioMEDesktopImage -Name "TestModule9" `
  -ImageIdResourceGroupName "ResourceGroupName" `
  -ImageType "ManagedImage" ` #This is the type of deployment
  -SubscriptionId "subscription id" `
  -VNetResourceId "Full resource id for your VNET!" `
  -AdminPassword $Password `
  -SubnetName "SubnetName" -Verbose
After that, it creates an image in Nerdio:

And in Microsoft Azure:

This is, of course, not the preferred option when using Windows 11. You want to use secure boot & trusted launch.
That is possible by using the same command but with these parameters:
$Password = ConvertTo-SecureString "Thisisatest123!" -AsPlainText -Force

New-NerdioMEDesktopImage -Name "TestModule7" `
  -ImageIdResourceGroupName "ResourceGroupName" `
  -ImageType "AzureComputeGallery" `
  -SubscriptionId "subscription id" `
  -VNetResourceId "Full resource id for your VNET!" `
  -AdminPassword $Password `
  -SubnetName "subnetname" `
  -AzureComputeGalleryResourceId "Full resource id for your Azure Compute Gallery!!" `
  -Verbose
As a result, this creates a VM, an image definition, and an image version:

And of course the resource in Nerdio:

As you can see, it has trusted launch as an option and it is deployed to multiple regions. (North Europe & West Europe)
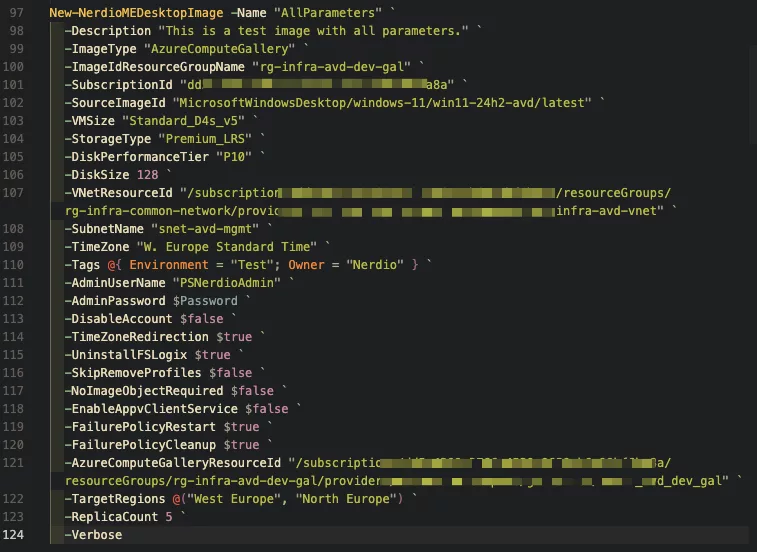
I mentioned earlier that I set a lot of default values in this command. If you would run the command with all custom values it would look like this. This is Azure Compute Gallery variant because most of you will use that one. I will specify what parameter has a default value and the value used is the default.
New-NerdioMEDesktopImage -Name "AllParameters" `
  -Description "This is a test image with all parameters." `
  -ImageType "AzureComputeGallery" `
  -ImageIdResourceGroupName "rg-infra-avd-dev-gal" `
  -SubscriptionId "SubscriptionId" `
  -SourceImageId "MicrosoftWindowsDesktop/windows-11/win11-24h2-avd/latest" ` #DefaultValue
  -VMSize "Standard_D4s_v5" ` #DefaultValue
  -StorageType "Premium_LRS" ` #DefaultValue
  -DiskPerformanceTier "P10" ` #DefaultValue
  -DiskSize 128 ` #DefaultValue
  -VNetResourceId "Full resource id for your VNET!" `
  -SubnetName "subnetname" `
  -TimeZone "W. Europe Standard Time" ` #DefaultValue
  -Tags @{ Environment = "Test"; Owner = "Nerdio" } ` #DefaultValue is empty
  -AdminUserName "PSNerdioAdmin" ` #DefaultValue
  -AdminPassword $Password `
  -DisableAccount $false ` #DefaultValue
  -TimeZoneRedirection $true ` #DefaultValue
  -UninstallFSLogix $true ` #DefaultValue
  -SkipRemoveProfiles $false ` #DefaultValue
  -NoImageObjectRequired $false ` #DefaultValue
  -EnableAppvClientService $false ` #DefaultValue
  -FailurePolicyRestart $true ` #DefaultValue
  -FailurePolicyCleanup $true ` #DefaultValue
  -AzureComputeGalleryResourceId "Full resource id for your Azure Compute Gallery!" `
  -TargetRegions @("West Europe", "North Europe") ` #DefaultValue
  -ReplicaCount 5 ` #DefaultValue
  -Verbose
Note: When running this command remove “#DefaultValue” & “#DefaultValue is empty”.
You can see that it took a bit of effort of building this command! And, it will be even greater in the next post!
Conclusion
I wanted to include the scripted actions, applications and schedules into this post but that would make it too long. So, that will be in the next part.
The image function in Nerdio works great and you can even configure it via Rest API. The only thing that misses are creating the resources you need to be able to create the image. So:
- Resource Groups
- VNet
- Azure Compute Gallery
- Probably more when we continue this series
I would love to do everything via one console.
The rest works great!
Hope to see you in the next one where we further enhance the image with customizations.