
In this series I am going to show you how build a Windows 10 Image via Azure Pipelines and DevOps without 3rd party tooling, welcome to part 1!
Part 1 is about building the Windows 10 machine, sysprepping it and creating an image from it.
Prerequisites
There are some prerequisites.
Firstly, I am assuming that you have knowledge of Azure DevOps. These are the parts that already need be setup:
- A Virtual Network in your Azure subscription.
- Service Connection via Service Principal to ARM (more information)
- Azure Key Vault with connection to Azure DevOps (more information)
- GIT Repo in Azure DevOps (more information)
In addition, if you don’t have knowledge about Azure DevOps and still want to follow this series please let me know. I might write a blog about the preparing Azure DevOps.
Checkout/Skip to the other parts
0. Windows 10 Image Series – Part 0 (Preparing Azure/Azure DevOps)
2. Windows 10 Image Series – Part 2 (Artifacts & Application Installation)
3. Windows 10 Image Series – Part 3 (Shared Image Gallery)
3.1 Windows 10 Image Series – Part 3.1 (Create test VM from Shared Image Gallery)
4. Windows 10 Image Series – Part 4 (SessionHost Deployment from Image)
5. Windows 10 Image Series – Part 5 (Convert the Image Build pipeline to YAML)
6. Windows 10 Image Series – Part 6 (Deploy Sessionhosts with Bicep and YAML)
Building the Windows 10 Image Pipeline
The pipeline consist of 3 parts:
- Building a Windows 10 machine using an ARM Template
- Sysprepping the Windows 10 machine that was just created
- Creating an image from the just created machine
We are starting with creating the pipeline.
Creating the pipeline
Firstly, log on to the Azure portal.
After that, create a resource group, for example:
- RG_WE_GoldenImage_WVD
This resourcegroup is for storing the Windows 10 images.

Log on to Azure DevOps.
After that, go to your repository and add a new folder:
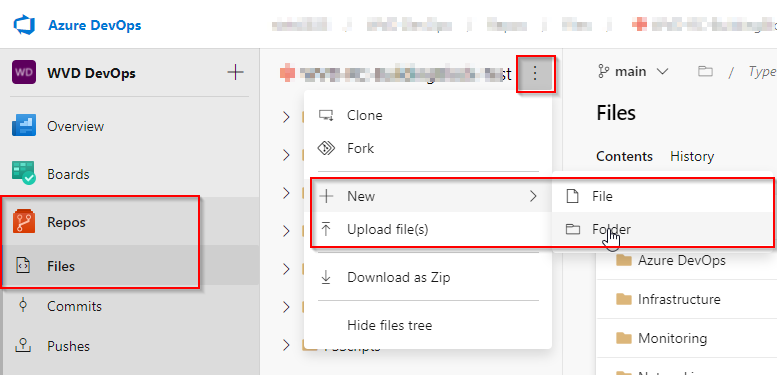
Call the folder ARM templates and put the following file in the folder:
- Windows10Template.json
Furthermore, you can find this file in my github. Your repo should look like this:

This ARM Template build the Windows 10 Virtual Machine.
Now go to pipelines:

Create a new pipeline:

Pick “Use the classic editor”:

Select your repository where you have put the ARM Template folder and file:

Lastly, start with an “Empty Job”:

Name the pipeline and select your agent pool:

Click on save:

The pipeline for Windows 10 Image Series – Part 1 has been created! Let’s go on to the next chapter.
Variable Groups
Next, go to “Library” in the pipelines section:

We are now going to create a variable group where we specify our variables for our build later on. That makes it easier to use the same variables through different scripts and templates.
Please click on “+ Variable Group”:

Name it and add the following variables:

ImageName –> Windows10Image_$(Build.DefinitionName)_$(Build.BuildId) – This is name that the image is going to have
ImageRGName –> RG_WE_GoldenImage_WVD – ResourceGroup where the image is going to land
Location –> WestEurope – Location for all the builds
RGName –> RG_WE_Win10ImageBuild_Temp – Resource Group where the VM is going to build and deleted afterwards
Subnet –> WVD-Build – Subnet where the VM is going to be build in
VMName –> Windows10VM_$(Build.DefinitionName)_$(Build.BuildId) – Generic Name for the VM
VNetResourceID –> Put the resource id of your VNET here
After that, click on save!
Next up, go to your Azure Key Vault in the Azure Portal. For example:

Add a secret to this key vault:


Name it: LocalAdminPassword and put a generated password in here:

Go back to Azure DevOps, pipelines, library and add a new variable group:

Name the variable group,
Choose “Link secret from an Azure Key vault as variables”
Pick your service connection and vault
Lastly, add the variables:

Go back to your azure pipeline:

Edit the pipeline:

Click on variables:

And link both variable groups to the pipeline:

This is what it should look like after that:

Filling the pipeline with jobs
It is now time to fill the pipeline with the jobs that handle these tasks:
- Building a Windows 10 machine using an ARM Template
- Sysprepping the Windows 10 machine that was just created
- Creating an image from the just created machine
Building a Windows 10 machine using an ARM Template
Firstly, add the ARM Template job by clicking on this icon:

After that, search for “ARM Template deployment” and click on add:

Rename the task and select the deployment scope:

After that, select the “Azure Resource Manager Connection”, “Subscription” and “Action”:

Next, enter a Resource Group name and a location. NOTE: The Resource Group should not exist! This will be automatically cleaned up when the machine has been converted to an image.

It is now time to pick the ARM template to deploy the Windows 10 VM.
Firstly, select “Linked Artifact”:

At the template section select the ARM template we added earlier on in the process. The Windows10template.json file:

Now click on “Override Template Parameters” and make sure to add the following parameters from the variable group created earlier:

Sysprepping the Windows 10 machine that was just created
Add a second job and search for Azure CLI:

Name the task, choos a resource manager connection, script type and a script location:

After that, put the following script in the “Inline Script section”:
$FileUri = "https://raw.githubusercontent.com/Ruthhl3ss/public/main/AzureVMExtensions/SysPrepScript.ps1"

Set-AzVMCustomScriptExtension -ResourceGroupName $(RGName) -VMName $(VMName) -Location $(Location) -FileUri $FileUri -Run 'SysPrepScript.ps1' -Name SysPrep

Get-AzVMExtension -ResourceGroupName $(RGName) -VMName $(VMName) | where {$_.ExtensionType -eq "CustomScriptExtension"} | Remove-AzVMExtension -Force
This script downloads a sysprep script from my github repository and applies it to the VM. If you are not comfortable using this public script you can also put the sysprep script in a storage account (more information).
Afterwards the ‘CustomScriptExtension’ is removed so you can apply another one later on if you want to.
After this step the VM is sysprepped and ready to be captured.
Creating an image from the just created machine
Add another Azure CLI Job to the pipeline:

Name the task, choos a resource manager connection, script type and a script location:

After that, put the following script in the “Inline Script section”:
#  Capture Image

$vmName = '$(VMName)'
$rgName = '$(RGName)'
$location = '$(Location)'
$imageName = '$(ImageName)'
$ImagergName = '$(ImageRGName)'


$VMStatus = Get-AzVM -ResourceGroupName $rgName -Name $vmName -Status

if ($VMStatus.Statuses[1].DisplayStatus -eq 'VM Running') {

    Write-Host 'VM is Running and will be turned off'

    Stop-AzVM -ResourceGroupName $rgName -Name $vmName -Force

    Set-AzVm -ResourceGroupName $rgName -Name $vmName -Generalized

    $vm = Get-AzVM -Name $vmName -ResourceGroupName $rgName

    $ImageConfiguration = New-AzImageConfig -Location $location -SourceVirtualMachineId $vm.Id

    New-AzImage -Image $ImageConfiguration -ImageName $imageName -ResourceGroupName $ImagergName

}
else {
    Write-Host 'VM is not running, capturing image will start immediatly'

    Set-AzVm -ResourceGroupName $rgName -Name $vmName -Generalized

    $vm = Get-AzVM -Name $vmName -ResourceGroupName $rgName

    $ImageConfiguration = New-AzImageConfig -Location $location -SourceVirtualMachineId $vm.Id

    New-AzImage -Image $ImageConfiguration -ImageName $imageName -ResourceGroupName $ImagergName
}

## Removing VM  Resource Group
$ExistingImages = Get-AzResource -ResourceGroupName $ImagergName | Where-Object ResourceType -eq 'Microsoft.Compute/images'

if ($ExistingImages.Name -contains $imageName) {

    Remove-AzResourceGroup -Name $rgName -Force

}
This script turns the VM off if it is running and creates a managed image from it. After that, the resource group where the VM was build is removed by this script.
Run the Pipeline
When you are finished creating the pipeline you can click on queue:

The pipeline will start creating the job:

This is the temporary resource group:

These are the temporary resources:

And last but not least there is the image being created:

And the resource group has been removed!
This was Windows 10 Image Series – Part 1, check out the other parts:
0. Windows 10 Image Series – Part 0 (Preparing Azure/Azure DevOps)
2. Windows 10 Image Series – Part 2 (Artifacts & Application Installation)
3. Windows 10 Image Series – Part 3 (Shared Image Gallery)
3.1 Windows 10 Image Series – Part 3.1 (Create test VM from Shared Image Gallery)
4. Windows 10 Image Series – Part 4 (SessionHost Deployment from Image)
5. Windows 10 Image Series – Part 5 (Convert the Image Build pipeline to YAML)
6. Windows 10 Image Series – Part 6 (Deploy Sessionhosts with Bicep and YAML)
Windows 10 Image Series
References
Other posts:
Autopilot Device info menu script
Powershell function for creating Hostpools
References
Microsoft Docs about AZExtensions
Great post. I am on the path of learning Azure DevOps and pipelines so if your able to do the prep Azure DevOps article I certainly be interested in viewing it!
Hi, I will create the prep post! Kind Regards, Niels
Thank you. I look forward to that intro post.
I have got Git, Visual Studio Code and an account on Azure DevOps all setup in preparation.
Your recent posts on building out the solution with Bicep and YAML is really interesting, cant wait to see how you teach us more around building out AVD using Infrastructure as Code.
https://www.nielskok.tech/devops/windows-10-image-series-part-0-prepare-azure-devops/
Wow that was quick! amazing
Hello Niels
Nice blog, I am trying to get it running but I had to request “azpipelines-parallelism-request”, I hope that makes it work. I would also opt for the Part-0 to setup the prerequisites.
Thank, with kind regards
Stefan
Hi Stefan,
Thanks for your comment. I will probably write the blog about the Azure DevOps setup in a couple of weeks. Please take a look at self hosted agents and add them to your Azure DevOps organization.
More info: https://docs.microsoft.com/en-us/azure/devops/pipelines/agents/v2-windows?view=azure-devops
Kind Regards,
Niels
I think the part 0 Azure DevOps setup would be great, i will try to setup all but I think the part 0 would help a lot
Thanks! I will create the part 0 next week!
hi Niels,
Great ready i want to setup a pipeline on my sub am on step “Name the pipeline and select your agent pool:”
the Agent pool you did make NOK Agents, I don’t have that option did mist a step ?
Hi Roni,
This is part of the prerequisites that you have knowledge about Azure DevOps but it’s fine. I will help you. You need to setup your own agents to run your pipeline jobs. Please follow this link to learn more:
https://docs.microsoft.com/en-us/azure/devops/pipelines/agents/agents?view=azure-devops&tabs=browser
If you have any more question, please let me know!
Kind Regards,
Niels
Thx Niels
I dident see that step, i will look in to it. BTW great work on your blog
Thanks!
Hi Niels
I try to follow the steps but I see that some part are no the same for me, do you plan to make a pre-part to the article?
Thanks! I will create the part 0 next week!
Thank you
https://www.nielskok.tech/devops/windows-10-image-series-part-0-prepare-azure-devops/
Hello Niels,
Thanks for part 0, it helped a lot. Now I am stuck in building the image from part 1. On the Windows Server that is used as the Agent I needed to install Azure CLI and Az (powershell).
The first part works creating the VM, but the Azure CLI keeps failing with these errors:
##
Set-AzVMCustomScriptExtension : No subscription found in the context. Please ensure that the credentials you provided
##
I have a clean Azure VM as agent (PAT) without any previous logged in Az sessions so that cannot be the problem.
Hope you can point me in the right direction!
Thx
Stefan
### ERRORS ###
C:\Windows\system32\cmd.exe /D /S /C “”C:\Program Files (x86)\Microsoft SDKs\Azure\CLI2\wbin\az.cmd” account set –subscription 5cbcb620-6216-432c-b48e-ed16e65c70a9″
C:\Windows\System32\WindowsPowerShell\v1.0\powershell.exe -NoLogo -NoProfile -NonInteractive -ExecutionPolicy Unrestricted -Command “. ‘C:\DevOps\_work\_temp\azureclitaskscript1630149469753.ps1′”
Set-AzVMCustomScriptExtension : No subscription found in the context. Please ensure that the credentials you provided
are authorized to access an Azure subscription, then run Connect-AzAccount to login.
At C:\DevOps\_work\_temp\azureclitaskscript1630149469753_inlinescript.ps1:3 char:1
+ Set-AzVMCustomScriptExtension -ResourceGroupName RG_WE_Win10ImageBuil …
+ ~~~~~~~~~~~~~~~~~~~~~~~~~~~~~~~~~~~~~~~~~~~~~~~~~~~~~~~~~~~~~~~~~~~~~
+ CategoryInfo : CloseError: (:) [Set-AzVMCustomScriptExtension], AzPSApplicationException
+ FullyQualifiedErrorId : Microsoft.Azure.Commands.Compute.SetAzureVMCustomScriptExtensionCommand
##[error]Script failed with exit code: 1
C:\Windows\system32\cmd.exe /D /S /C “”C:\Program Files (x86)\Microsoft SDKs\Azure\CLI2\wbin\az.cmd” account clear”
Hi Stefan,
Thanks for reading my blog and trying it for yourself. On which part does the pipeline fail? On the sysprep script or? The error that you are getting states that your Az CLI session has no context. That means that you need to select a subscription prior to running the script. This should be handeld by the Azure DevOps Pipeline task when selecting your service connection. Could you please state at which step you are getting this error?
Thanks,
Niels
Hi Niels,
I’m receiving the same error with the SysPrep task. The strange thing is that the connection to the tenant is present in the task. Do you know a solution to fix this?
Thanks,
Mark
Yeah, that is strange.
Does your Service Principal have Owner permissions or contributor permissions?
You could add an addition authentication step in the inline script section to make sure you are connected with the proper permissions and selected the proper permissions. This sometimes works for me. After that the script is able to run. I don’t know why that is the case. I need to do some further investigation on this part.
The additional authentication step in powershell is:
$secret = ConvertTo-SecureString -String (YOUR SECRET for your Service Principal) -AsPlainText -Force> -ServicePrincipal> | Set-AzContext
$username = (App ID for your Service Principal)
$Credential = New-Object -TypeName “System.Management.Automation.PSCredential” -ArgumentList $username, $secret
Connect-AzAccount -Credential $Credential -Tenant <
Start-Sleep 5
Select-AzSubscription -SubscriptionId <
I will investigate this further. Thanks for letting me know.
Niels
Hi Niels,
The Service Principal has Owner permissions on the subscription.
I have implemented your suggestion about the authentication step and that worked once.
At the moment i’m still using the buildin agent pool, so maybe that has something to do with that. The job will timeout around 60 minutes.
I did found another workaround yesterday and that was using azure cli:
$customScriptUri = “https://raw.githubusercontent.com/Ruthhl3ss/public/main/AzureVMExtensions/SysPrepScript.ps1″
$customScriptSettings=”{`\`”fileUris`\`”:[`\`”$customScriptUri`\`”], `\`”commandToExecute`\`”:`\`”powershell.exe ./SysPrepScript.ps1`\`”}”
az vm extension set `
–name CustomScriptExtension `
–publisher Microsoft.Compute `
–vm-name $(VMName) `
–resource-group $(RGName) `
–settings $customScriptSettings
Also the CaptureImage task needs the authentication part to be successfull. I needed to install the correct PowerShell Modules because some Modules aren’t loaded by default.
But the task didn’t need a rebuild to azure cli commands.
Mark
Hello Niel,
You are correct it is in the Azure CLI part, your extra lines of PowerShell fixed the problem. The sysprep script now runs without error.
Unfortunately the next script “Azure CLI – Capture Image” fails with a strange error:
2021-09-04T20:55:50.4587841Z
2021-09-04T20:55:51.4822694Z Windows10VM_WVDImageBuild_30 : The term ‘Windows10VM_WVDImageBuild_30’ is not recognized as the name of a cmdlet,
2021-09-04T20:55:51.4823675Z function, script file, or operable program. Check the spelling of the name, or if a path was included, verify that the
2021-09-04T20:55:51.4824275Z path is correct and try again.
2021-09-04T20:55:51.4824981Z At C:\DevOps\_work\_temp\azureclitaskscript1630788938020_inlinescript.ps1:9 char:11
2021-09-04T20:55:51.4825605Z + $vmName = Windows10VM_WVDImageBuild_30
2021-09-04T20:55:51.4826099Z + ~~~~~~~~~~~~~~~~~~~~~~~~~~~~
2021-09-04T20:55:51.4827213Z + CategoryInfo : ObjectNotFound: (Windows10VM_WVDImageBuild_30:String) [], ParentContainsErrorRecordExcep
2021-09-04T20:55:51.4828175Z tion
2021-09-04T20:55:51.4831565Z + FullyQualifiedErrorId : CommandNotFoundException
2021-09-04T20:55:51.4832877Z
2021-09-04T20:55:51.5275943Z ##[error]Script failed with exit code: 1
It is complaining about this line in the inline script (line 9):
$vmName = $(VMName)
Also I head to remove all the “ = ” from this script, else it wouldn’t run at all.
Hope you can help me with the last part!
Thx
Stefan
Hello Niels,
Sorry my previous post was full of typos 🙂
You are correct it is in the Azure CLI part, your extra lines of PowerShell fixed the problem. The sysprep script now runs without error.
Unfortunately the next script “Azure CLI – Capture Image” fails with a strange error:
2021-09-04T20:55:50.4587841Z
2021-09-04T20:55:51.4822694Z Windows10VM_WVDImageBuild_30 : The term ‘Windows10VM_WVDImageBuild_30’ is not recognized as the name of a cmdlet,
2021-09-04T20:55:51.4823675Z function, script file, or operable program. Check the spelling of the name, or if a path was included, verify that the
2021-09-04T20:55:51.4824275Z path is correct and try again.
2021-09-04T20:55:51.4824981Z At C:\DevOps\_work\_temp\azureclitaskscript1630788938020_inlinescript.ps1:9 char:11
2021-09-04T20:55:51.4825605Z + $vmName = Windows10VM_WVDImageBuild_30
2021-09-04T20:55:51.4826099Z + ~~~~~~~~~~~~~~~~~~~~~~~~~~~~
2021-09-04T20:55:51.4827213Z + CategoryInfo : ObjectNotFound: (Windows10VM_WVDImageBuild_30:String) [], ParentContainsErrorRecordExcep
2021-09-04T20:55:51.4828175Z tion
2021-09-04T20:55:51.4831565Z + FullyQualifiedErrorId : CommandNotFoundException
2021-09-04T20:55:51.4832877Z
2021-09-04T20:55:51.5275943Z ##[error]Script failed with exit code: 1
It is complaining about this line in the inline script (line 9):
$vmName = $(VMName)
Also I had to remove all the “ = ” from this script, else it wouldn’t run at all.
Update; Fixed it:
$vmName = $(VMName) <—- wrong.
the ' where lost in copy/paste and removing the " = "
$vmName = '$(VMName)' <—- correct.
Last part now fixed, mayby you can put the scripts on github for download, that save some copy/past errors perhaps.
Thx
Stefan
Thanks Stefan. I will!
Hi Niel
QQ not sure where to get this
VNetResourceID –> Put the resource id of your VNET here
As in the RG i did created any event as I did see any step to do so
Hi Roni,
I assumed that you already have a VNet available in your Azure subscription. If this is not the case, please create one. In the properties blade of the VNet, you can find the resource ID. Please use this value as requested.
I will put this in the prerequisites.
Niels
i created i vnet in the RG_WE_goldennimage_WVD RG
add the vnet id to the liberty but now
2021-09-03T08:25:40.2525238Z There were errors in your deployment. Error code: DeploymentFailed.
2021-09-03T08:25:40.2555353Z ##[error]At least one resource deployment operation failed. Please list deployment operations for details. Please see https://aka.ms/DeployOperations for usage details.
2021-09-03T08:25:40.2567810Z ##[error]Details:
2021-09-03T08:25:40.2574886Z ##[error]LinkedInvalidPropertyId: Property id ‘$)VNetResourceID)/subnets/WVD-Build’ at path ‘properties.ipConfigurations[0].properties.subnet.id’ is invalid. Expect fully qualified resource Id that start with ‘/subscriptions/{subscriptionId}’ or ‘/providers/{resourceProviderNamespace}/’.
Do you still need help with something?
Hi Niels
just that one
Set-AzVMCustomScriptExtension : The term ‘Set-AzVMCustomScriptExtension’ is not recognized as the name of a cmdlet,
function, script file, or operable program. Check the spelling of the name, or if a path was included, verify that the
path is correct and try again.
At C:\Agents\_work\_temp\azureclitaskscript1630660070868_inlinescript.ps1:3 char:1
+ Set-AzVMCustomScriptExtension -ResourceGroupName RG_WE_Win10ImageBuil …
+ ~~~~~~~~~~~~~~~~~~~~~~~~~~~~~
+ CategoryInfo : ObjectNotFound: (Set-AzVMCustomScriptExtension:String) [], ParentContainsErrorRecordExce
ption
+ FullyQualifiedErrorId : CommandNotFoundException
##[error]Script failed with exit code: 1
C:\Windows\system32\cmd.exe /D /S /C “”C:\Program Files (x86)\Microsoft SDKs\Azure\CLI2\wbin\az.cmd” account clea
fixed:)
Hi Niels
when i try to do Choose “Link secret from an Azure Key vault as variables”
i get
Specified Azure service connection needs to have “Get, List” secret management permissions on the selected key vault. Set these secret permissions in Azure portal or run the following commands in powershell window.
ok fixed it 🙂
sorry again me when i run the pipline i get
##[error]Deployment template validation failed: ‘The value for the template parameter ‘virtualNetworkId’ at line ‘1’ and column ‘337’ is not provided
what step did I miss?
ok fixed 🙂
sorry to be a pain 🙂
Set-AzVMCustomScriptExtension : The term ‘Set-AzVMCustomScriptExtension’ is not recognized as the name of a cmdlet,
function, script file, or operable program. Check the spelling of the name, or if a path was included, verify that the
path is correct and try again.
At C:\Agents\_work\_temp\azureclitaskscript1630660070868_inlinescript.ps1:3 char:1
+ Set-AzVMCustomScriptExtension -ResourceGroupName RG_WE_Win10ImageBuil …
+ ~~~~~~~~~~~~~~~~~~~~~~~~~~~~~
+ CategoryInfo : ObjectNotFound: (Set-AzVMCustomScriptExtension:String) [], ParentContainsErrorRecordExce
ption
+ FullyQualifiedErrorId : CommandNotFoundException
##[error]Script failed with exit code: 1
C:\Windows\system32\cmd.exe /D /S /C “”C:\Program Files (x86)\Microsoft SDKs\Azure\CLI2\wbin\az.cmd” account clea
hi
Am still stuck on
Set-AzVMCustomScriptExtension : The term ‘Set-AzVMCustomScriptExtension’ is not recognized as the name of a cmdlet,
in the sysprem task could any one help? what did I miss ?
Hi Roni,
Did you install the Az powershell modules on the agent which is running the pipeline?
https://docs.microsoft.com/en-us/powershell/azure/install-az-ps?view=azps-6.4.0
hi Niels
yes I did install them on the VM that I use to run the agent
I did all the steps in the post but I get this error.:(
In part 0 I did see that as a reqieremnt
Hi Roni,
Can you try to run this Powershell script manually from the agent? Does it work when you try that?
Thanks,
Niels
Hi Niels,
In which step did you put this or did you created a separated step in the pipeline?
Regards,
Dave
Hi Dave,
At the end of the post, it is a pipeline. You can also check out the Packer YAML series which is a lot easier.
Thanks,
Niels
Hi Niels
Thanks I will check that one. I have an error on this one. I created an extra azure powershell step because I got an error on the Set-AzVMCustomScriptExtension. Now I have this. Can you help.
My pipeline is now
Arm template deployment
Azure PowerShell V5 (install module az.compute and import it )
azure cli sys prep
azure cli – capture image
C:\Windows\system32\cmd.exe /D /S /C “”C:\Program Files (x86)\Microsoft SDKs\Azure\CLI2\wbin\az.cmd” account set –subscription 20b6fe01-31f4-489b-ac13-f25e7fd83c68″
C:\Windows\System32\WindowsPowerShell\v1.0\powershell.exe -NoLogo -NoProfile -NonInteractive -ExecutionPolicy Unrestricted -Command “. ‘D:\a\_temp\azureclitaskscript1652728818980.ps1′”
C:\Program Files\WindowsPowerShell\Modules\Az.Compute\4.26.0\Compute.Autorest\Az.Compute.psm1 :
This module requires Az.Accounts version 2.2.3 or greater. For installation instructions, please see:
https://docs.microsoft.com/powershell/azure/install-az-ps
At D:\a\_temp\azureclitaskscript1652728818976_inlinescript.ps1:3 char:1
+ Import-Module Az.Compute
+ ~~~~~~~~~~~~~~~~~~~~~~~~
+ CategoryInfo : NotSpecified: (:) [Write-Error], WriteErrorException
+ FullyQualifiedErrorId : Microsoft.PowerShell.Commands.WriteErrorException,Az.Compute.psm1
##[error]Script failed with exit code: 1
C:\Windows\system32\cmd.exe /D /S /C “”C:\Program Files (x86)\Microsoft SDKs\Azure\CLI2\wbin\az.cmd” account clear”
Finishing: Azure CLI – Sysprep
Hi Dave,
You need to update or install Azure CLI on the machine where the script is running.
If you have more questions, don’t hesitate to ask.
Thanks,
Niels
Hi Niels
I did recreated all and now i get
Set-AzVMCustomScriptExtension : The Resource ‘Microsoft.Compute/virtualMachines/Windows10VM_WVDImageBuilder_8’ under re
source group ‘RG_WE_Win10ImageBuild_Temp’ was not found. For more details please go to https://aka.ms/ARMResourceNotFou
ndFix
ErrorCode: ResourceNotFound
ErrorMessage: The Resource ‘Microsoft.Compute/virtualMachines/Windows10VM_WVDImageBuilder_8’ under resource group ‘RG_W
E_Win10ImageBuild_Temp’ was not found. For more details please go to https://aka.ms/ARMResourceNotFoundFix
I see that the machines NIc are created in RG_WE_GoldenImage_WVD and in RG_WE_GoldenImage_WVD_temp and RG_WE_GoldenImage_WVD_teamp is not created.
I did look over all the step I done see that did a wrong any ideas?
thank you
Hi Roni.
Did you properly name this variable:
VMName –> Windows10VM_$(Build.DefinitionName)_$(Build.BuildId) – Generic Name for the VM
What is the Virtual Machine name of the VM in the Azure Resource Group?
This should equal:
Windows10VM_$(Build.DefinitionName)_$(Build.BuildId)
Goodluck!
Niels
Hi Niels
yes the property are correct set
the VM name is Windows10VM_WVDImageBuilder_9 its in RG_WE_GoldenImage_WVD
after the syspre try to find in RG_WE_GoldenImage_WVD_temp
ErrorMessage: The Resource ‘Microsoft.Compute/virtualMachines/Windows10VM_WVDImageBuilder_9’ under resource group ‘RG_W
E_Win10ImageBuild_Temp’ was not found. For more details please go to https://aka.ms/ARMResourceNotFoundFix
ErrorTarget:
StatusCode: 404
found it wrong RG name in ARM Template deploeyment – windows 10 VM step
Roni,
You are really haging in there. Lovely to see!
Kind Regards,
Niels
now this part 1 works thx
I think it the bast post about packer and I want to learn it,
I hope the last issue 🙂
in the image capture i get
Unexpected token ‘&’ in expression or statement.
At C:\packer\_work\_temp\azureclitaskscript1632924474235_inlinescript.ps1:3 char:19
+ $vmName = ’Windows10VM_WVDImageBuilder_13′
The ampersand (&) character is not allowed. The & operator is reserved for future use; wrap an ampersand in double quot
ation marks (“&”) to pass it as part of a string.
At C:\packer\_work\_temp\azureclitaskscript1632924474235_inlinescript.ps1:4 char:8
+ $rgName = ’RG_WE_Win10ImageBuild_Temp’
Perfect Mate. Let me know if you need more help.
hi Niels
the fun never stops is did copy the code for your blog but I get this in the image capture
At C:\packer\_work\_temp\azureclitaskscript1632994667955_inlinescript.ps1:3 char:8
+ $vmName = ’Windows10VM_WVDImageBuilder_17′
+ ~
Unexpected token ‘&’ in expression or statement.
At C:\packer\_work\_temp\azureclitaskscript1632994667955_inlinescript.ps1:3 char:19
+ $vmName = ’Windows10VM_WVDImageBuilder_17′
+ ~
The ampersand (&) character is not allowed. The & operator is reserved for future use; wrap an ampersand in double quot
ation marks (“&”) to pass it as part of a string.
At C:\packer\_work\_temp\azureclitaskscript1632994667955_inlinescript.ps1:4 char:8
+ $rgName = ’RG_WE_Win10ImageBuild_Temp’
Hi Roni,
Did you enter a ‘&’ in the code? That is not allowed. Did you enter more or other special signs?
Thanks,
Niels
no
just that code
# Capture Image
$vmName = ’$(VMName)’
$rgName = ’$(RGName)’
$location = ’$(Location)’
$imageName = ’$(ImageName)’
$ImagergName = ’$(ImageRGName)’
$VMStatus = Get-AzVM -ResourceGroupName $rgName -Name $vmName -Status
if ($VMStatus.Statuses[1].DisplayStatus -eq ’VM Running’) {
Write-Host ’VM is Running and will be turned off’
Stop-AzVM -ResourceGroupName $rgName -Name $vmName -Force
Set-AzVm -ResourceGroupName $rgName -Name $vmName -Generalized
$vm = Get-AzVM -Name $vmName -ResourceGroupName $rgName
$ImageConfiguration = New-AzImageConfig -Location $location -SourceVirtualMachineId $vm.Id
New-AzImage -Image $ImageConfiguration -ImageName $imageName -ResourceGroupName $ImagergName
}
else {
Write-Host ’VM is not running, capturing image will start immediatly’
Set-AzVm -ResourceGroupName $rgName -Name $vmName -Generalized
$vm = Get-AzVM -Name $vmName -ResourceGroupName $rgName
$ImageConfiguration = New-AzImageConfig -Location $location -SourceVirtualMachineId $vm.Id
New-AzImage -Image $ImageConfiguration -ImageName $imageName -ResourceGroupName $ImagergName
}
## Removing VM Resource Group
$ExistingImages = Get-AzResource -ResourceGroupName $ImagergName | Where-Object ResourceType -eq ’Microsoft.Compute/images’
if ($ExistingImages.Name -contains $imageName) {
Remove-AzResourceGroup -Name $rgName -Force
}
i did just copy your code,
$vmName = ‘$(VMName)’ as a exemple 🙁
ok it works but i need to edit your code
that’s the code that works for me I this some did wrong past in the blog post
# Capture Image
$vmName = ‘$(VMName)’
$rgName = ‘$(RGName)’
$location = ‘$(Location)’
$imageName = ‘$(ImageName)’
$ImagergName = ‘$(ImageRGName)’
$VMStatus = Get-AzVM -ResourceGroupName $rgName -Name $vmName -Status
if ($VMStatus.Statuses[1].DisplayStatus -eq ‘VM Running’) {
Write-Host ‘VM is Running and will be turned off’
Stop-AzVM -ResourceGroupName $rgName -Name $vmName -Force
Set-AzVm -ResourceGroupName $rgName -Name $vmName -Generalized
$vm = Get-AzVM -Name $vmName -ResourceGroupName $rgName
$ImageConfiguration = New-AzImageConfig -Location $location -SourceVirtualMachineId $vm.Id
New-AzImage -Image $ImageConfiguration -ImageName $imageName -ResourceGroupName $ImagergName
}
else {
Write-Host ‘VM is not running, capturing image will start immediatly’
Set-AzVm -ResourceGroupName $rgName -Name $vmName -Generalized
$vm = Get-AzVM -Name $vmName -ResourceGroupName $rgName
$ImageConfiguration = New-AzImageConfig -Location $location -SourceVirtualMachineId $vm.Id
New-AzImage -Image $ImageConfiguration -ImageName $imageName -ResourceGroupName $ImagergName
}
## Removing VM Resource Group
$ExistingImages = Get-AzResource -ResourceGroupName $ImagergName | Where-Object ResourceType -eq ‘Microsoft.Compute/images’
if ($ExistingImages.Name -contains $imageName) {
Remove-AzResourceGroup -Name $rgName -Force
}
Hi Roni,
Thanks for the update. The WordPress plugin does something strange with the code snippets. I have updated the code.
Thanks,
Niels
Hi Niels,
I am also getting the following error:
Set-AzVMCustomScriptExtension : The term ‘Set-AzVMCustomScriptExtension’ is not recognized as the name of a cmdlet
I have configured the self hosted agent and installed AZURE CLI
https://learn.microsoft.com/en-us/cli/azure/install-azure-cli-windows?tabs=azure-cli
And installed the the AZ module for All users
Install-Module -Name Az -Scope AllUsers -Repository PSGallery -Force
On the self hosted agent server I can connect to the az account and run az commands:
PS C:\windows\system32> Get-AzVMExtension
cmdlet Get-AzVMExtension at command pipeline position 1
Supply values for the following parameters:
(Type !? for Help.)
ResourceGroupName:
I have restarted the server and tried reinstalling the modules. Do you know what I overlooked? Alvast bedankt!
Hi Dirk,
I am a little confused, why don’t you test the set-azvmcustomscriptextension on the agent?
Furthermore, I currently like the packer approach. You can check out these in blogs also!
Thanks,
Niels